Introduction
Using a version control system ↗️ is no more just a fancy skill that can be added on your resume but a great tool to help you manage your codebase for any project.
Git is a free and open-source distributed version control system designed to handle everything from small to very large projects with speed and efficiency.
Today we will learn 5 basic commands of Git that you must know as a developer.
I’ll be also adding bonus commands at the end of this blog so keep an eye for that.
Download & install git at https://git-scm.com/ ↗️ if you haven’t yet.
1. git init
The very first thing you need to do is to initialize your project folder to use git.
We do this by using the git init command.
git initYou would see output something like this
Initialized empty Git repository in /path/to/your/folder/.git/2. git clone
While the previous command helps you to initialize a git repo, git clone helps you to clone a repository from a remote location like Github, Gitlab, Bitbucket, etc.
git clone <:remote-url:>Example
git clone https://github.com/nodejs/node.gitThis will clone the nodejs repository to your local machine.
Tip: By default, it will clone into the folder with the name of the repository i.e node in the above example. If you want to change the folder name then just add another argument of the folder name at the end of the URL
git clone https://github.com/nodejs/node.git myfoldername3. git add
So now you either have initialized your repo or cloned from a remote repo. Now we will see how to add the changes you have made to the git system
We will see the use of git add command.
Suppose you have 5 files in your project
├── main.js├── styles.css├── index.html├── about.html└── contact.htmlYou have made changes in index.html & about.html and now you want to add these changes to git.
You can do something like this to add these files.
git add index.html about.htmlNow, this is perfectly fine, but often you will have lots of files to be added and you definitely don’t want to write the file names all again. To overcome this we will use the following way
git add .The . basically means add all the files in which I have made changes.
4. git commit
Up until now, we have just added the files, but in git, we have to also commit those files to mark them as a checkpoint in your project codebase.
To do this, we will use git commit command.
This command takes a mandatory flag -m which is for the message you want to give to this commit.
Why is it mandatory?
Git uses a hash value to keep track of the checkpoints you have made using the commit command. However, I’m pretty sure you don’t want to remember that hash b39203bc42f means that you have changed index.html and about.html right?
So for simplicity, we add a nice message to our commit so that we as a human can understand what all things have been changed up until this point.
Check out the example
git commit -m "index.html updated and about.html added"Now we have successfully committed our changes to the git system.
5. git push/pull
So now you are working on a project and making lots of commits to properly manage the history of your code.
But now you want to share this with other people around and want others to collaborate on your project?
For this we will see how to use git push and git pull command to host your codebase on various platforms like Github, Gitlab and Bitbucket.
To push your code from local machine to a remote repository, you have to use
git push <:remote:><:branch:>Example
git push origin masterwill push to your origin on the master branch.
Similarly, now if you want to bring changes from your remote repository to your local machine, we will use the git pull command.
git pull origin masterConfused about what is origin? Then read the following paragraph or you can simply skip to the Bonus section.
origin is an alias on your system which defines where is your remote repository at.
Use the following command to check what the origin is aliased to
git remote -vIt will display the output of all the aliases you have and where do those aliases point to. (Yes, you can have multiple aliases)
Death is hard enough. Accessing accounts shouldn't be.

When someone passes away, their family is often locked out of the accounts, documents, and details they were meant to have. Eternal Vault is my fix for that: a secure place to store what matters and hand it to the right people when it's needed.
🔥Bonus
These are a few other basic commands that are can be helpful.
6. git config
This command helps you to make changes in the configuration file of git.
You can use --global flag to list/update your global git config file.
For example, you can set your name and email to the global git config and this would add your name and email to all the actions you perform in any of your projects which is using git.
git config --global user.name "Your Name"See the changes by typing,
git config --global --list7. git status
Use this command to check the status of the current working tree.
Simply said what all files have been changed, are they added, are they committed, are they push to remote, etc all this info can be viewed using git status command.
git statusOn branch masterChanges not staged for commit: (use "git add <file>..." to update what will be committed) (use "git restore <file>..." to discard changes in working directory) modified: node.txt
no changes added to commit (use "git add" and/or "git commit -a")8. git log
git log is used to check the logs/history of all the commits you have made
git logIt has many useful flags you can use to view the logs in a better format. The set of flags I use daily with this command is
git log --oneline --all --decorate --graph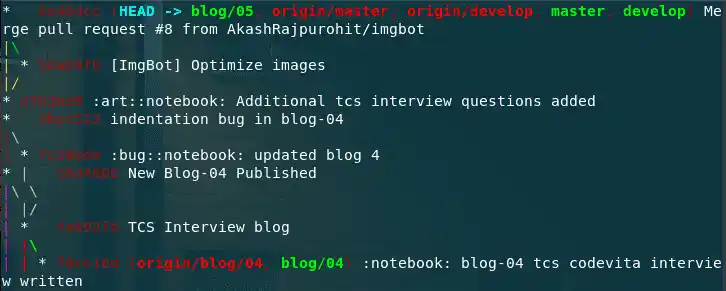
TL;DR
We discuss very basic and important git commands that you must know as a developer in 2020. We also see a few bonus commands which aren’t that much necessary to look into but always good to know.