Introduction
Raise your hand if you ever encountered a scenario where you were just browsing the internet reading something and suddenly whole lot of ads starts popping up and you eventually just give up and quit the website. I’m sure most of us have been there.
I am not saying ads are totally bad, they are a great way for content creators to make money and keep their content free for everyone (I do it too for this website with EthicalAds ↗️ [Not sponsored]). But sometimes, the ads can be too much and can ruin the browsing experience. And don’t forget about the trackers that are used to track your browsing habits and serve you more targeted ads.
To solve this problem, you can use ad blockers on your devices, but that’s not a great solution. You have to install ad blockers on every device you own and you have to keep them updated. And what about the devices that don’t support ad blockers? Like smart TVs, gaming consoles, etc.
That’s where a network wide ad blocker comes in. It’s a great way to block ads and trackers on your network without having to install ad blockers on every device. In this article, I’ll talk about AdGuardHome, a network-wide ad blocking software that you can run in your homelab.
What is Network-Wide Ad Blocking?
Network-wide ad blocking is a technique that blocks ads and trackers at the network level, preventing them from reaching your devices. This is achieved by intercepting DNS requests and filtering out known ad-serving domains and tracking servers. As a result, ads and trackers are blocked before they even reach your devices, providing a seamless ad-free browsing experience across your entire network.
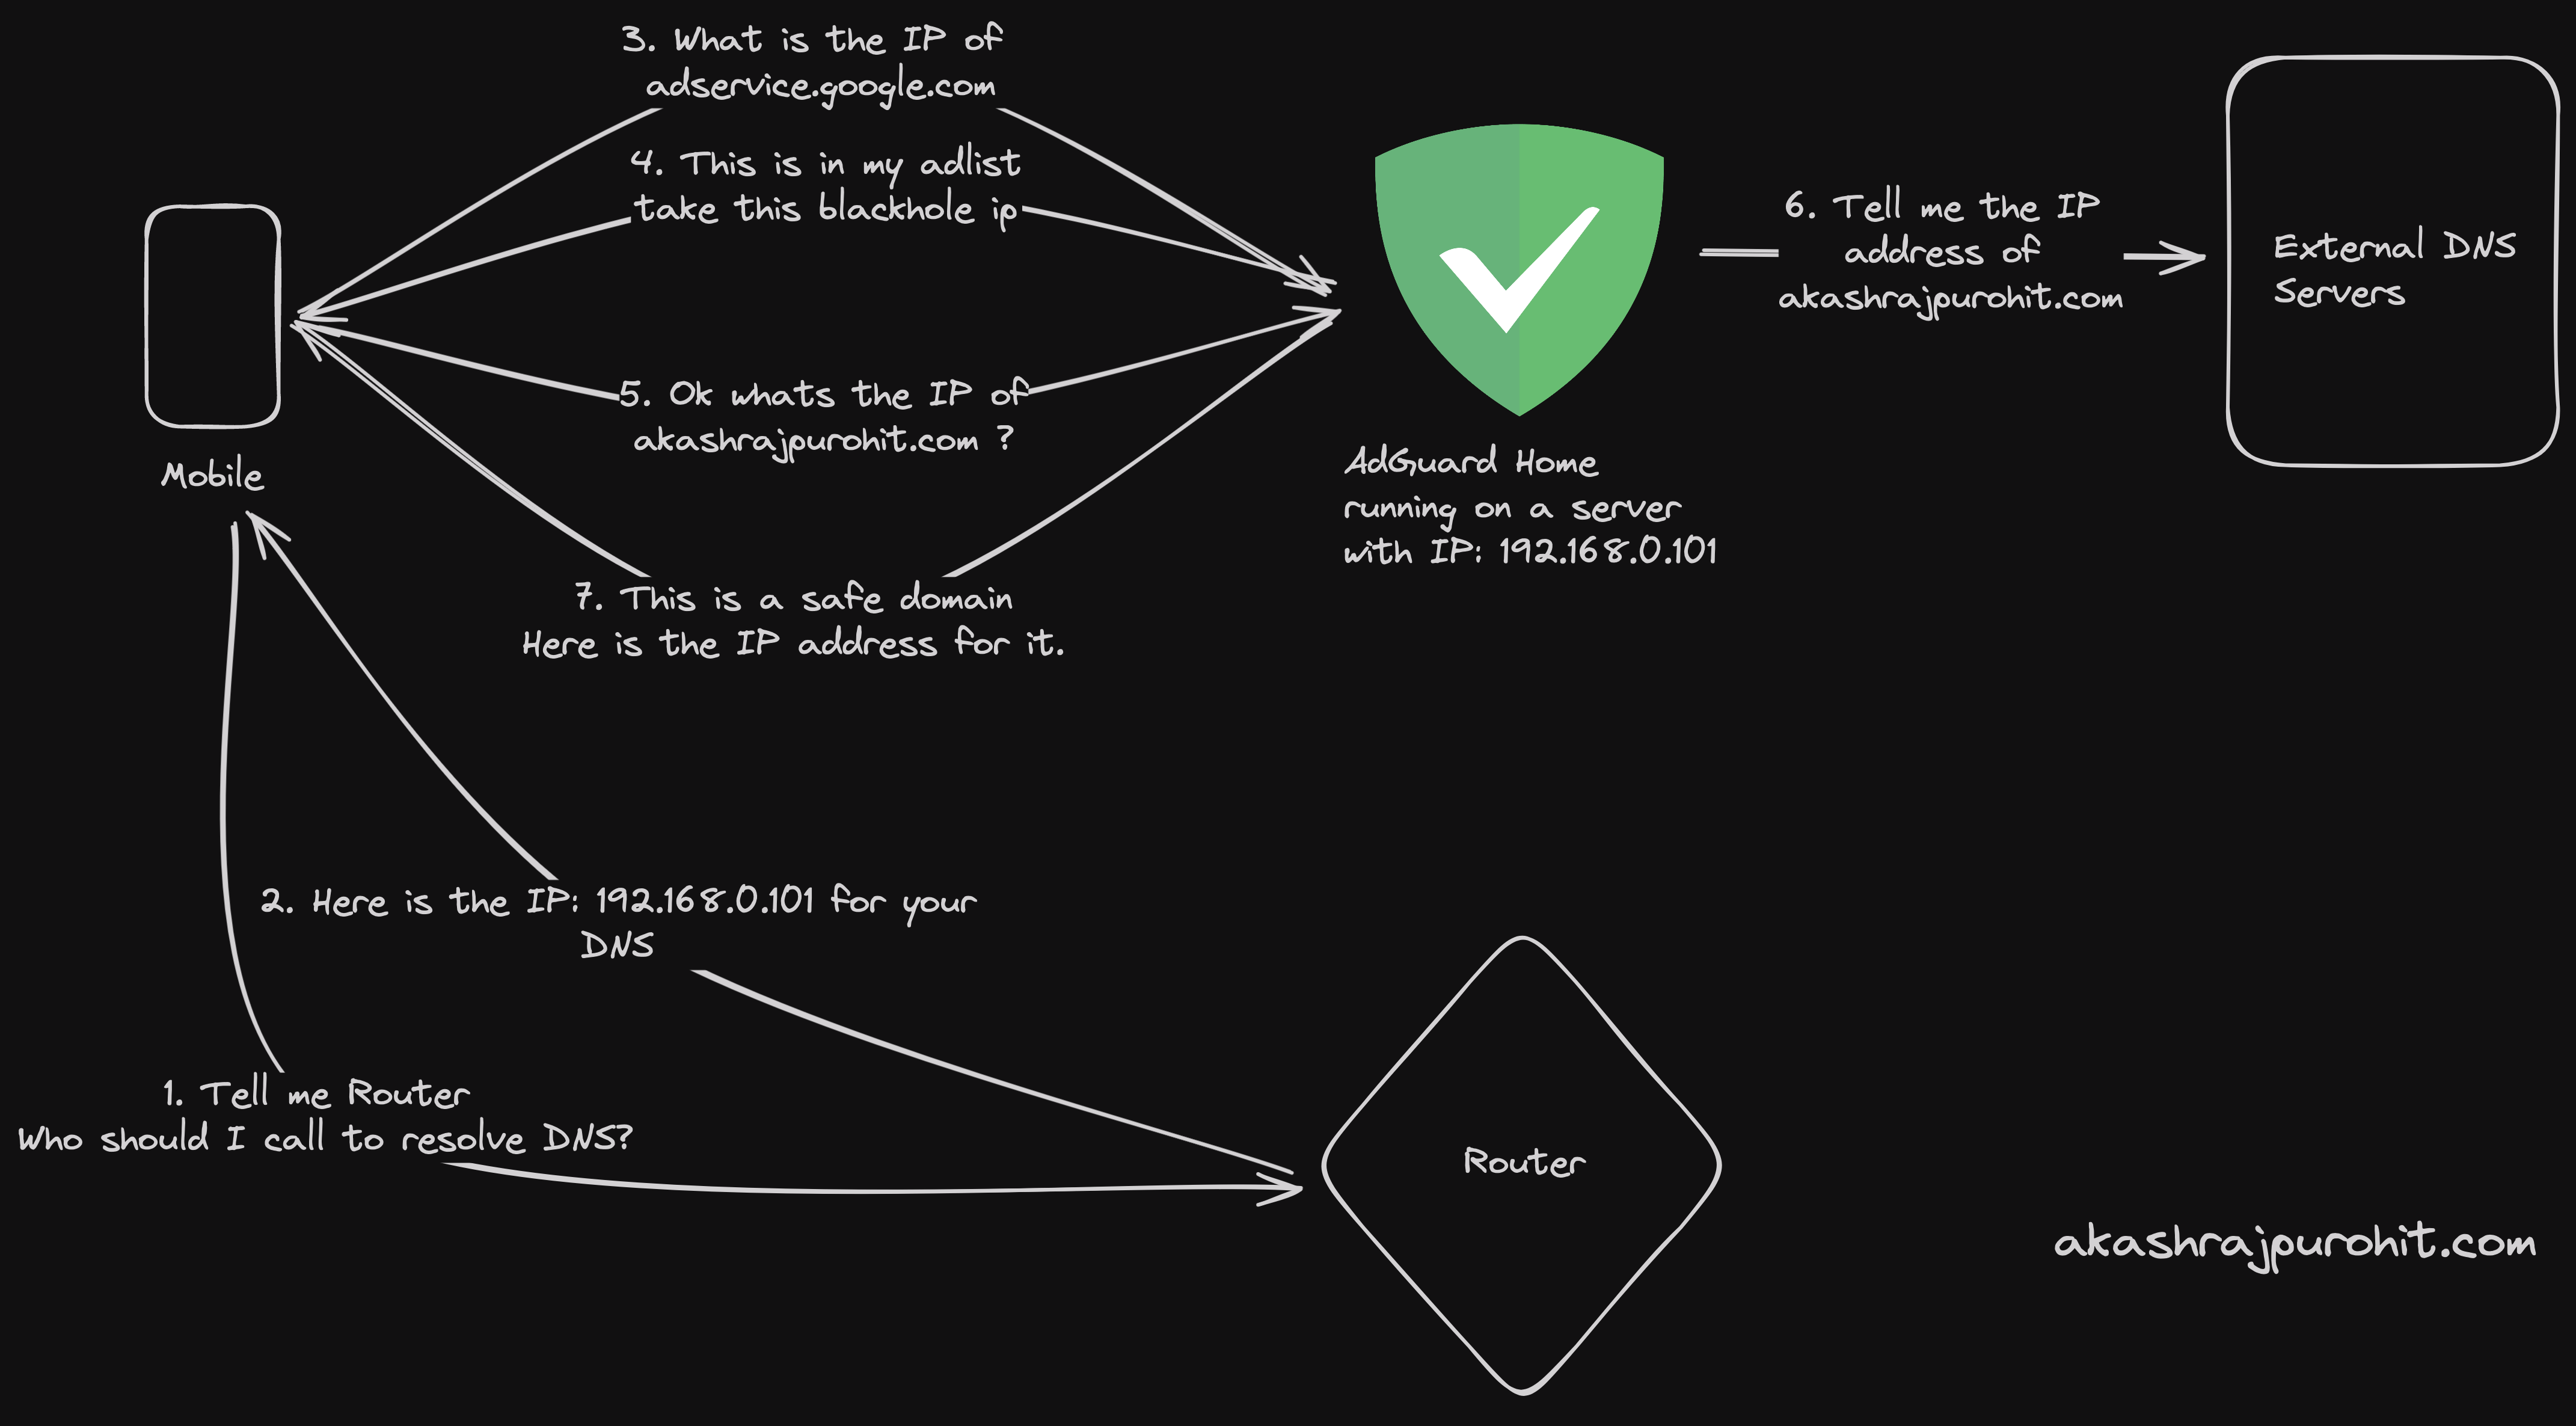
All your outgoing DNS requests are routed through the network-wide ad blocker, essentially acting like a gatekeeper that filters out unwanted content. This centralized approach offers several advantages:
-
Protects all devices: Unlike browser extensions, network-wide ad blocking safeguards all devices connected to your network, including computers, smartphones, tablets, and even smart TVs.
-
Enhanced performance: By filtering ads at the network level, your devices avoid downloading unnecessary data, leading to faster browsing speeds and improved overall performance.
-
Streamlined management: Manage ad blocking for your entire network from a single central point, eliminating the need to configure individual extensions on every device.
Enter AdGuardHome
AdGuard Home ↗️, a free and open-source software solution, emerges as a powerful weapon in your homelab arsenal for achieving network-wide ad blocking. Developed by AdGuard, a company renowned for its ad-blocking expertise, AdGuard Home offers a robust set of features to customize your ad-blocking experience.
How it works is quite simple, let say a request for a ad domain comes in from a device on your network, AdGuard Home will send back a response that points to a blackhole IP address (this is usually a non-routable IP address like 0.0.0.0 often also called as a DNS sinkhole) instead of the actual IP address of the ad server. This effectively blocks the ad from being loaded on the device.
Some of the key features of AdGuard Home include:
-
DNS-based ad blocking: AdGuard Home acts as a DNS (Domain Name System) server, intercepting DNS requests and filtering out those associated with known ad servers.
-
Extensive filter lists: It comes pre-loaded with a variety of filter lists to block ads, trackers, malware, and phishing attempts. You can further customize your filtering by adding additional lists tailored to your specific needs.
-
Parental controls: Safeguard your family by leveraging parental control features to restrict access to inappropriate content. So if you have kids at home, you can ensure they’re protected from harmful content.
-
Detailed logging and analytics: Gain insights into your network traffic by analyzing AdGuard Home’s comprehensive logs and reports.
-
Local DNS rewriting: Customize DNS responses to redirect specific domains to different IP addresses, allowing you to create custom rules for your network.
-
Lightweight and resource-efficient: AdGuard Home operates efficiently, even on resource-constrained devices commonly found in homelabs.
Death is hard enough. Accessing accounts shouldn't be.

When someone passes away, their family is often locked out of the accounts, documents, and details they were meant to have. Eternal Vault is my fix for that: a secure place to store what matters and hand it to the right people when it's needed.
Installing AdGuard Home on Your Homelab
The installation process for AdGuard Home is very straightforward since they have a handy script for automated installation. You can install AdGuard Home on a variety of platforms, including Linux, macOS, and even Docker. In this article, I’ll walk you through the installation process on a Linux server.
Here is the one liner to install AdGuard Home on your Linux server:
curl -s -S -L https://raw.githubusercontent.com/AdguardTeam/AdGuardHome/master/scripts/install.sh | sh -s -- -vIf you are looking to install it on a different platform then you can checkout their GitHub repository ↗️ for the instructions.
Once you have installed AdGuard Home, you can access the web interface by navigating to http://<your-server-ip>:3000 in your web browser. You will be prompted to set up your admin password and configure your upstream DNS servers. You can use the default settings or customize them to your liking.
Once this is done, you need to tell your router to use AdGuard Home as the primary DNS server. Every router have different settings but you can usually find this in the DHCP settings of your router. Under DHCP you should see an option to add DNS servers, just add the IP address of your AdGuard Home server there and that’s pretty much it.
Now if you kept the default settings while setting up the admin interface, your listen interface should be configured to run on port 80. This means you can now access the AdGuard Home web interface by navigating to http://<your-server-ip> in your web browser.
Now with the installation complete and your router configured, you have successfully set up AdGuard Home on your homelab. You can now enjoy ad-free browsing across all your devices without having to install ad blockers on each one.
My AdGuard Configurations
In this section, I’ll go through some of the configurations that I have set up on my AdGuard Home server.
Static IP Address
When you are setting up AdGuard Home, it’s a good idea to assign a static IP address to your server. This ensures that the IP address of your AdGuard Home server remains consistent, making it easier to manage and configure your network settings.
I do it from the Router settings where I reserve an IP address for my AdGuard Home server. This way, the router will always assign the same IP address to my AdGuard Home server every time it connects to the network.
Upstream DNS Servers
I have configured my AdGuard Home server to use Cloudflare’s ↗️ DNS servers along with Quad9 ↗️. These are privacy-focused DNS servers that provide fast and secure DNS resolution. You can configure your upstream DNS servers by navigating to the Settings -> DNS settings tab in the AdGuard Home web interface.
I also chose to use DNS-over-HTTPS (DoH) for my upstream DNS servers. This encrypts the DNS traffic between my AdGuard Home server and the upstream DNS servers, providing an additional layer of privacy and even my ISP can’t see my DNS queries.
DNS rewrites
I heavily use DNS rewrites feature of AdGuard Home, basically to route all internal traffic via Nginx reverse proxy. This is a bit advanced but it’s a great way to manage your internal services and also to have a single point of entry for all your services.
So for the three servers that I am running currently in my homelab, here’s how the DNS rewrites look like:
| Domain | Answer |
|---|---|
| sukuna.lan | 192.168.0.100 |
| suguru.lan | 192.168.0.101 |
| satoru.lan | 192.168.0.102 |
And then I have an entry for nginx reverse proxy as well which points to the server where I am running the nginx reverse proxy:
| Domain | Answer |
|---|---|
| nginx.lan | suguru.lan |
This way now all the subdomains that I have for my homelab services going through the reverse proxy can find their way to the correct server when I add a wildcard DNS entry for each of the servers like this:
| Domain | Answer |
|---|---|
| *.sukuna.lan | nginx.lan |
| *.suguru.lan | nginx.lan |
| *.satoru.lan | nginx.lan |
DNS blocklists
AdGuard Home comes with a variety of pre-configured blocklists to block ads, trackers, and malware. You can further customize your ad-blocking experience by adding additional blocklists tailored to your specific needs.
One of the blocklist I have added is Steven Black’s List ↗️. You can head to the Filters -> DNS blocklists and add a new list by choosing from the list of blocklist AdGuard Home comes with, or even provide a custom list if you want.
High Availability
Currently I am running two instances of AdGuard Home in my network for High Availability. This is to ensure that in case one of my device goes out for some reason, I can avoid DNS issues.
I use adguardhome-sync ↗️ to synchronize configurations from the primary instance to the replicas so that whenever I make any change in the config, it is propagated correctly to the secondary instance as well.
That’s pretty much of the major configurations that I have, apart from them there are few tweaks that I have done as per my usage and would also suggest you to explore the service to learn more about it.
Conclusion
AdGuard Home, with its robust feature set and commitment to open-source development, empowers you to take control of your network and combat the constant barrage of online ads. By leveraging its capabilities within your homelab, you can create a more secure, streamlined, and ad-free browsing experience for all devices on your network
If you have any questions or suggestions, feel free to reach out to me on Twitter ↗️ / Reddit ↗️.
See you in another one where we’ll talk about some other service that I am self hosting 👋