Introduction
I have a lot of services running in my homelab, and it becomes a bit of a hassle to remember all the ports and IPs of each service. I also want to expose some of these services to the internet, but I don’t want to expose them directly. This is where Nginx comes in. Nginx is a powerful reverse proxy that I use in my homelab to expose services to the internet. In this post, I’ll show you how I use it and how you can use it too.
What is a reverse proxy?
Let’s first take a step back and understand what a reverse proxy is. A reverse proxy is a server that sits between the internet and your web servers. It receives requests from clients and forwards them to the appropriate backend servers. It can also perform additional tasks such as load balancing, caching, and SSL termination.
You can read more about it here: Reverse Proxies: A Beginner’s Guide to Unlocking Their Power
Setting up Nginx
I run Nginx directly on my host machine, but you can also run it in a container. Here is the installation steps for setting up Nginx bare metal:
sudo apt install nginx -yOnce installed, you can start the Nginx service:
sudo systemctl start nginxYou should also enable the Nginx service to start on boot:
sudo systemctl enable nginxUse the following command to check the status of the Nginx service:
sudo systemctl status nginxThe intent layer for B2B outbound

AI monitors LinkedIn and X for real buyer intent — job changes, funding, hiring — then delivers scored, enriched warm leads with the opener already drafted, every morning.
Nginx Configurations
Let’s now understand some of the basic configurations that you need to do to get Nginx up and running.
Server Blocks
Nginx uses server blocks to host multiple websites on a single server. Each server block has its own configuration and can host multiple websites. The server block configuration is stored in the /etc/nginx/sites-available directory. You can create a new server block configuration file for your website using the following command:
sudo vi /etc/nginx/sites-available/example.comHere is an example of a basic server block configuration:
server {    listen 80;    server_name service.example.com;
    set $UPSTREAM_IP 192.168.0.101;    set $UPSTREAM_PORT 3100;
    location / {        proxy_pass http://$UPSTREAM_IP:$UPSTREAM_PORT;    }}
In this example, we are creating a server block for service.example.com. We are listening on port 80 and forwarding the requests to the backend server running on http://192.168.0.101:3100. You can create multiple server block configuration files for different websites and services.
Snippets
Nginx snippets are reusable configuration blocks that can be included in multiple server blocks. You can create a new snippet configuration file using the following command:
sudo vi /etc/nginx/snippets/proxy-defaults.confHere is an example of a basic snippet configuration:
proxy_set_header Host $host;proxy_set_header X-Real-IP $remote_addr;proxy_set_header X-Forwarded-For $remote_addr;proxy_set_header X-Forwarded-Proto $scheme;proxy_set_header X-Forwarded-Host $host;proxy_redirect off;proxy_http_version 1.1;
# WebSocket supportproxy_set_header Upgrade $http_upgrade;proxy_set_header Connection "Upgrade";
In this example, we are creating a snippet configuration file that sets the necessary headers for proxying requests. You can include this snippet in your server block configuration files using the include directive.
Considering the above server block example, you can include the snippet like this:
server {    listen 80;    server_name service.example.com;
    set $UPSTREAM_IP 192.168.0.101;    set $UPSTREAM_PORT 3100;
    include /etc/nginx/snippets/proxy-defaults.conf;
    location / {        proxy_pass http://$UPSTREAM_IP:$UPSTREAM_PORT;    }}
Custom Configs
You can also create custom configurations for Nginx. You can create a new custom configuration file using the following command:
sudo vi /etc/nginx/conf.d/base.confHere is an example of a basic custom configuration:
# disable nginx version in headers and error pagesserver_tokens off;This will disable the Nginx version in the headers and error pages.
Any configs which are added in the conf.d directory are automatically included in the Nginx configuration. You can find this in the nginx.conf file:
include /etc/nginx/conf.d/*.conf;Enabling the Server
Once you have created the server block configuration file, you need to enable it by creating a symbolic link to the sites-enabled directory. Let’s enable the example.com server block configuration file:
sudo ln -s /etc/nginx/sites-available/example.com /etc/nginx/sites-enabled/You can also check the Nginx configuration for any syntax errors using the following command:
sudo nginx -tIf there are no syntax errors, you can reload the Nginx service to apply the new configuration:
sudo systemctl reload nginxNow if you visit service.example.com in your browser, you should see the website hosted on the backend server.
My Nginx Configurations
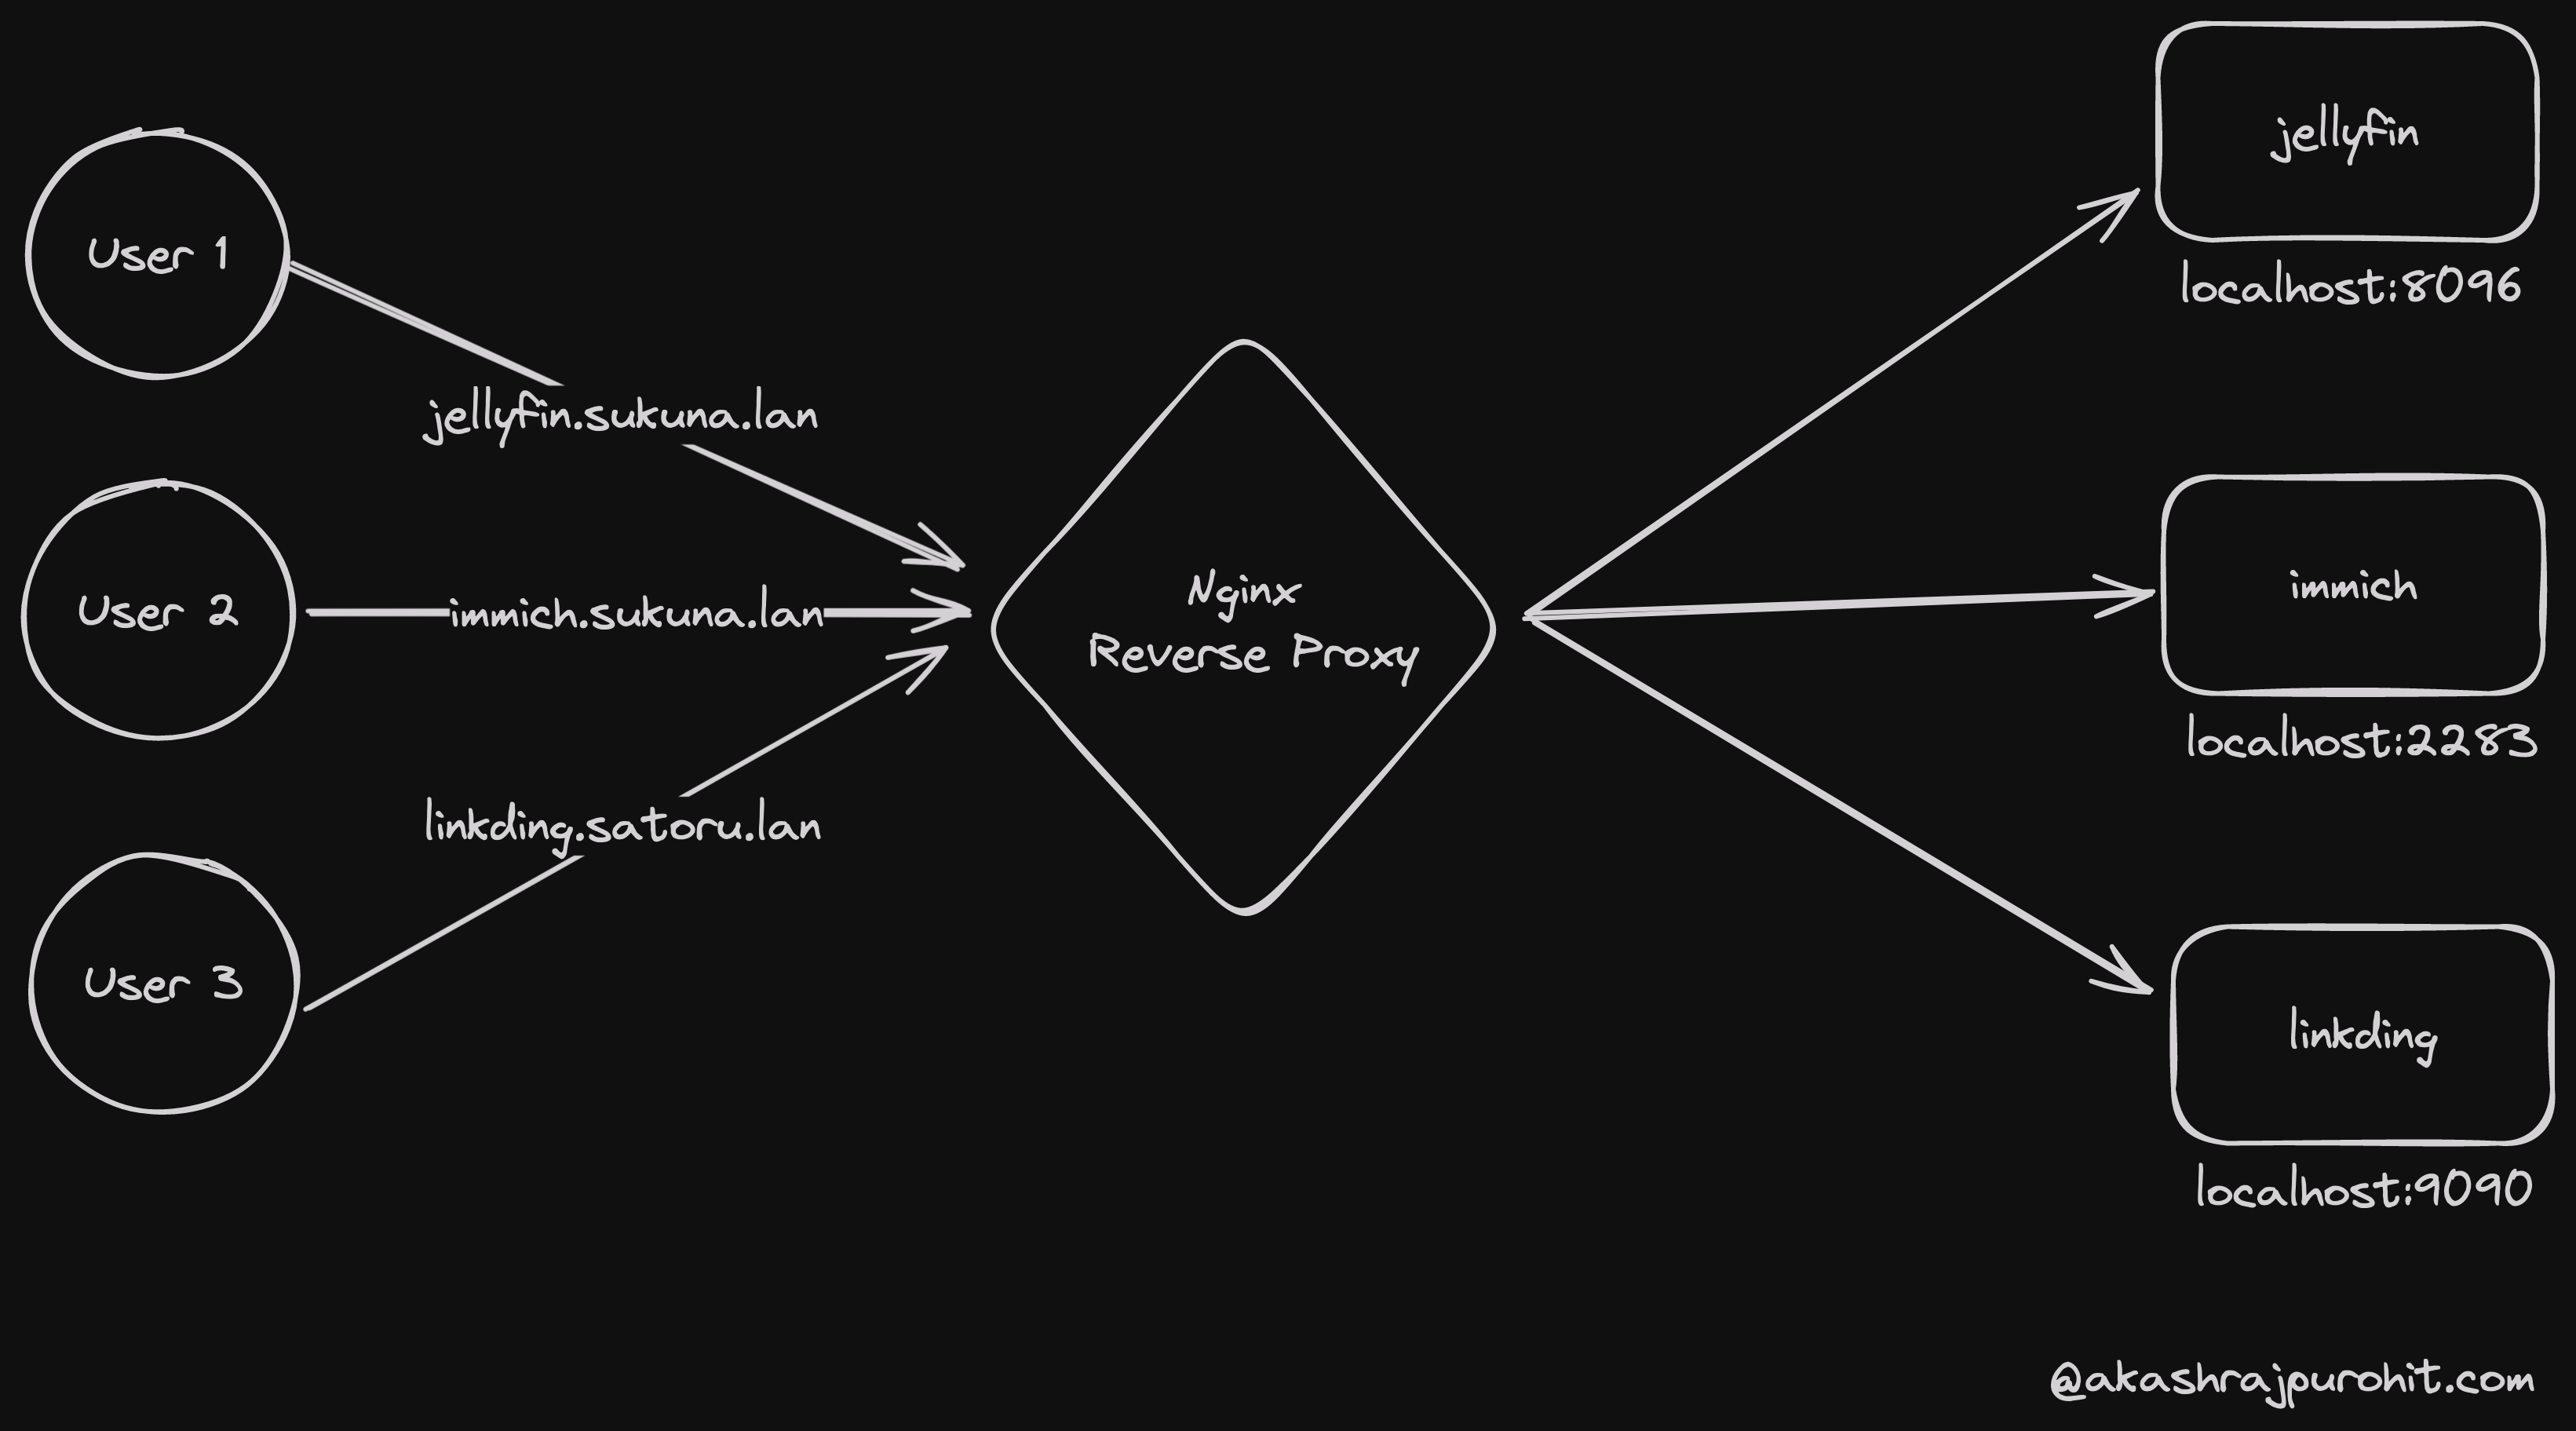
I have a lot of services running across multiple servers in my homelab. I use Nginx to reverse proxy everything. Considering three servers that I have named sukuna.lan, satoru.lan and sukuna.lan and let’s say I am running immich on sukuna server on port 2283, the FQDN for the service would be immich.sukuna.lan. Here is how I would configure Nginx for this:
server {    listen 80;    server_name immich.sukuna.lan;
    set $UPSTREAM_IP 192.168.0.100;    set $UPSTREAM_PORT 2283;
    include /etc/nginx/snippets/proxy-defaults.conf;
    location / {        proxy_pass http://$UPSTREAM_IP:$UPSTREAM_PORT;    }}
Now this works for HTTP, but I also want to enable HTTPS for some my services like Vaultwarden. For such service I have generated a self signed certificate.
To use the self signed certificates, I have few other snippets like ssl-params.conf and self-signed.conf which I include in the server block configuration file.
Here are the snippets:
ssl_protocols TLSv1.2 TLSv1.3;ssl_prefer_server_ciphers on;ssl_ciphers "EECDH+AESGCM:EDH+AESGCM:AES256+EECDH:AES256+EDH";ssl_ecdh_curve secp384r1;ssl_session_cache shared:SSL:10m;add_header X-Frame-Options DENY;add_header X-Content-Type-Options nosniff;
ssl_dhparam /etc/ssl/certs/dhparam.pem;
And another one for the self signed certificate:
ssl_certificate /etc/ssl/certs/self-signed.crt;ssl_certificate_key /etc/ssl/private/self-signed.key;And here is how I include these snippets in the server block configuration file:
server {    listen 80;    server_name vault.satoru.lan;
    return 307 https://$server_name$request_uri;}
server {    listen 443 ssl http2;    server_name vault.satoru.lan;
    set $UPSTREAM_IP 192.168.0.101;    set $UPSTREAM_PORT 4400;
    include snippets/proxy-defaults.conf;    include snippets/self-signed.conf;    include snippets/ssl-params.conf;
    location / {        proxy_pass http://$UPSTREAM_IP:$UPSTREAM_PORT;    }}
Here we are listening on port 443 and enabling SSL. We are also including the self-signed.conf and ssl-params.conf snippets. Additionally all requests to the HTTP port are redirected to the HTTPS port.
This is essentially how I am using Nginx for all my services whether it is HTTP or HTTPS. I also automate creation of these configs via Ansible to make my life a bit easier and make these configs better maintainable but I will cover about that in a separate post so keep an eye out for that.
Conclusion
Nginx is a powerful reverse proxy that I use in my homelab to expose services to the internet. In this post, I showed you how I use it and how you can use it too.
If you have any questions or suggestions, feel free to reach out to me on Twitter ↗️ / Reddit ↗️.
See you in another one! 👋