Introduction
As promised in my previous post, today I will be sharing about how I set up Jellyfin with hardware acceleration on my Orange Pi 5 Plus server.
Recently I migrated Jellyfin along with couple of other services on my new Orange Pi 5 Plus server. The Orange Pi 5 Plus has a Rockchip RK3558 SoC which has with integrated ARM Mali-G610 GPU which is compatible with OpenGL ES1.1/2.0/3.2, OpenCL 2.2 and Vulkan 1.2. This helps in offloading the video decoding and encoding tasks from the CPU to the GPU which results in better performance and lower power consumption.
In addition to common codecs, the RK3558 chip from Orange Pi 5 Plus is also able to support 10-bit H.264 (High10) and AV1 decoding, and has an H.264/HEVC encoding speed of up to 1080p@480fps or 4k@120fps which is quite impressive.
With that said, let’s get started with the setup.
Prerequisites
Before we start, here is what I did as the prerequisites to enable hardware acceleration for Jellyfin.
Install Ubuntu 22.04 (Jammy)
I installed Ubuntu 22.04 (Jammy) headless on my Orange Pi 5 Plus. You can download the image from the Orange Pi 5 Plus website ↗️ and flash it on a microSD card or a NVME drive.
The reason for choosing Ubuntu 22.04 is that it has good support for Rockchip SoCs and the drivers required for hardware acceleration are available easily.
One thing to take a note of is that the Kernel version of 6.1 or 5.10 LTS is required for the Mali G610 GPU to work. You can check the kernel version by running the following command.
uname -rIf you are using the Ubuntu 24.04 image from Joshua Reik ubuntu-rockchip ↗️ repository, then you can skip the below steps as the image comes with the required drivers pre-installed.
Skip directly to the Setting up Jellyfin section.
Install and enable the GPU drivers
We will add two repositories to install the GPU drivers. The first repository is to download the Mali G610 firmware and the second one to get the rockchip multimedia configuration.
sudo add-apt-repository ppa:rockchip-linux/ppasudo add-apt-repository ppa:liujianfeng1994/rockchip-multimediaNext, update the package list and install the required packages.
sudo apt update && sudo apt install mali-g610-firmware rockchip-multimedia-configOptionally you can then remove the repositories.
sudo add-apt-repository --remove ppa:liujianfeng1994/panfork-mesasudo add-apt-repository --remove ppa:liujianfeng1994/rockchip-multimediaNow to support HDR tone-mapping we will install OpenCL runtime (libmali) on our system. We will find this here ↗️. Copy these commands to your terminal to start installing the OpenCL runtime.
mkdir -p ~/tmp/libmali && cd ~/tmp/libmaliwget 'https://github.com/tsukumijima/libmali-rockchip/releases/download/v1.9-1-55611b0/libmali-valhall-g610-g13p0-gbm_1.9-1_arm64.deb'sudo dpkg -i ./libmali-valhall-g610-g13p0-gbm_1.9-1_arm64.debFinally we will just verify that our devices are available which are required for hardware acceleration.
for dev in dri dma_heap mali0 rga mpp_service \ iep mpp-service vpu_service vpu-service \ hevc_service hevc-service rkvdec rkvenc vepu h265e ; do \ [ -e "/dev/$dev" ] && echo " --device /dev/$dev"; \ doneIf you see an output like below, then you are good to go.
--device /dev/dri--device /dev/dma_heap--device /dev/mali0--device /dev/rga--device /dev/mpp_serviceWith these prerequisites done, we can now move on to setting up Jellyfin.
Setting up Jellyfin
Jellyfin have brought in support for hardware acceleration on Rockchip from version 10.9.0. So we will install the version 10.9.0 or later. At the time of writing this post, the latest version is 10.9.7.
I am using Docker to run Jellyfin and I have a docker-compose file for the same. Here is the docker-compose file I am using.
services: jellyfin: image: 'ghcr.io/jellyfin/jellyfin:10.9.10' container_name: 'jellyfin' ports: - '8096:8096/tcp' security_opt: # enables full access to /sys and /proc, still far better than privileged: true - systempaths=unconfined - apparmor=unconfined group_add: - 44 # video group devices: - '/dev/dri:/dev/dri' - '/dev/dma_heap:/dev/dma_heap' - '/dev/mali0:/dev/mali0' - '/dev/rga:/dev/rga' - '/dev/mpp_service:/dev/mpp_service' volumes: - './config:/config' - './cache:/cache' - '/media/content:/media' restart: unless-stoppedIt is a standard docker-compose file but I will highlight few important parts here. First thing is that we need escalate the container’s privileges to access the GPU devices. We do this by adding the security_opt option. This is better than using privileged: true as it only gives access to /sys and /proc directories.
Next we add the GPU devices to the container using the devices option. This will allow the container to access the GPU devices.
Additionally we adding the video group to the container using the group_add option. This is required to access the video devices. You can check what is the id of the video group by running the following command.
getent group video | cut -d: -f3With this docker-compose file, you can now start Jellyfin by running the following command.
docker-compose up -dOnce the container is up, you can access Jellyfin on http://<your-ip>:8096 and start setting up your media library.
To verify that the OpenCL runtime is working correctly inside the docker container, you can run this command.
docker exec -it jellyfin /usr/lib/jellyfin-ffmpeg/ffmpeg -v debug -init_hw_device rkmpp=rk -init_hw_device opencl=ocl@rkIf you see an output like this, then the OpenCL runtime is working correctly.
arm_release_ver: g13p0-01eac0, rk_so_ver: 10[AVHWDeviceContext @ 0x55b1c52f00] 1 OpenCL platforms found.[AVHWDeviceContext @ 0x55b1c52f00] 1 OpenCL devices found on platform "ARM Platform".[AVHWDeviceContext @ 0x55b1c52f00] 0.0: ARM Platform / Mali-G610 r0p0[AVHWDeviceContext @ 0x55b1c52f00] cl_arm_import_memory found as platform extension.[AVHWDeviceContext @ 0x55b1c52f00] cl_khr_image2d_from_buffer found as platform extension.[AVHWDeviceContext @ 0x55b1c52f00] DRM to OpenCL mapping on ARM function found (clImportMemoryARM).Successfully parsed a group of options.If you see any errors then you might have missed something in the prerequisites. Go back and check the prerequisites again. If you are still facing issues, feel free to ask in the comments.
Turn social conversations into qualified leads

AI monitors Reddit, Hacker News, and Bluesky 24/7 to find people actively looking for solutions like yours — delivered to Slack or email before competitors notice.
Enable Hardware Acceleration in Jellyfin
Now this is the final but very important step (side story, I spend a good 30 minutes only to realize that I missed this step, so don’t be like me 😅).
To enable hardware acceleration in Jellyfin, go to Dashboard -> Playback -> Transcoding. Under Hardware acceleration choose Rockchip MPP (RKMPP) and enable hardware decoding for H.264, HVEC, HVEC 10 bit and AV1 codecs.
If your OpenCL runtime is working correctly, then you can also select the Enable Tone mapping option to enable HDR tone mapping.
Go below and click on Save to save the settings and you are done.
Moment of Truth
Those were some pretty good amount of steps that we had to do right, so let’s see if it was worth it. To test it I played a 4K HVEC HDR video and here are the results.
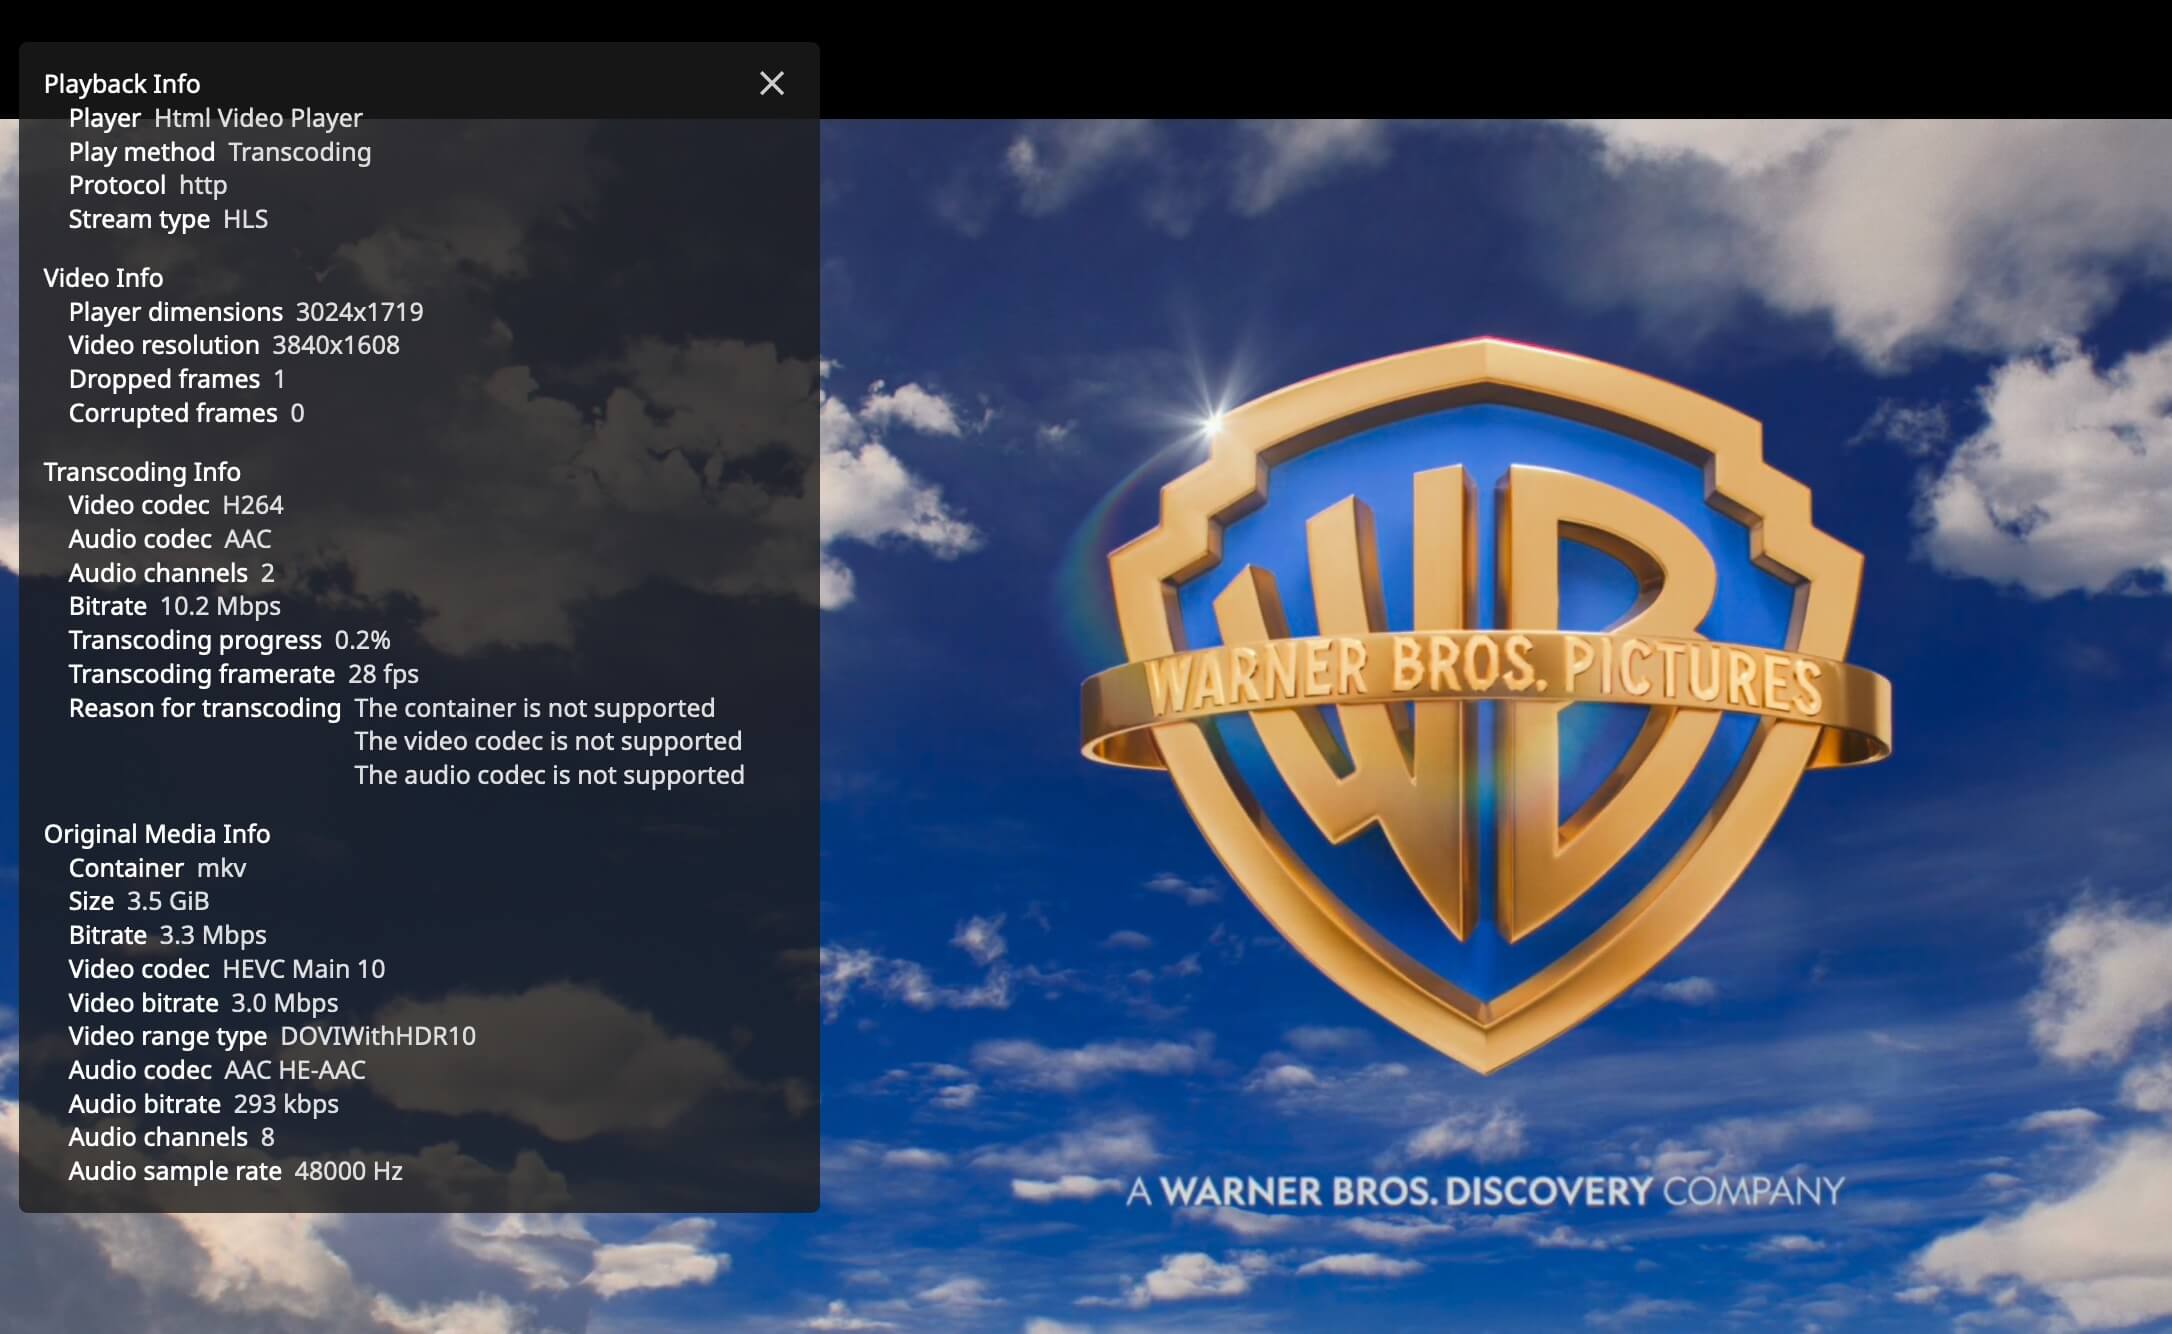
The above image shows the Jellyfin video player showing the playback stats and the video being transcoded with ffmpeg.
Let’s look at the CPU usage when the video is being played.
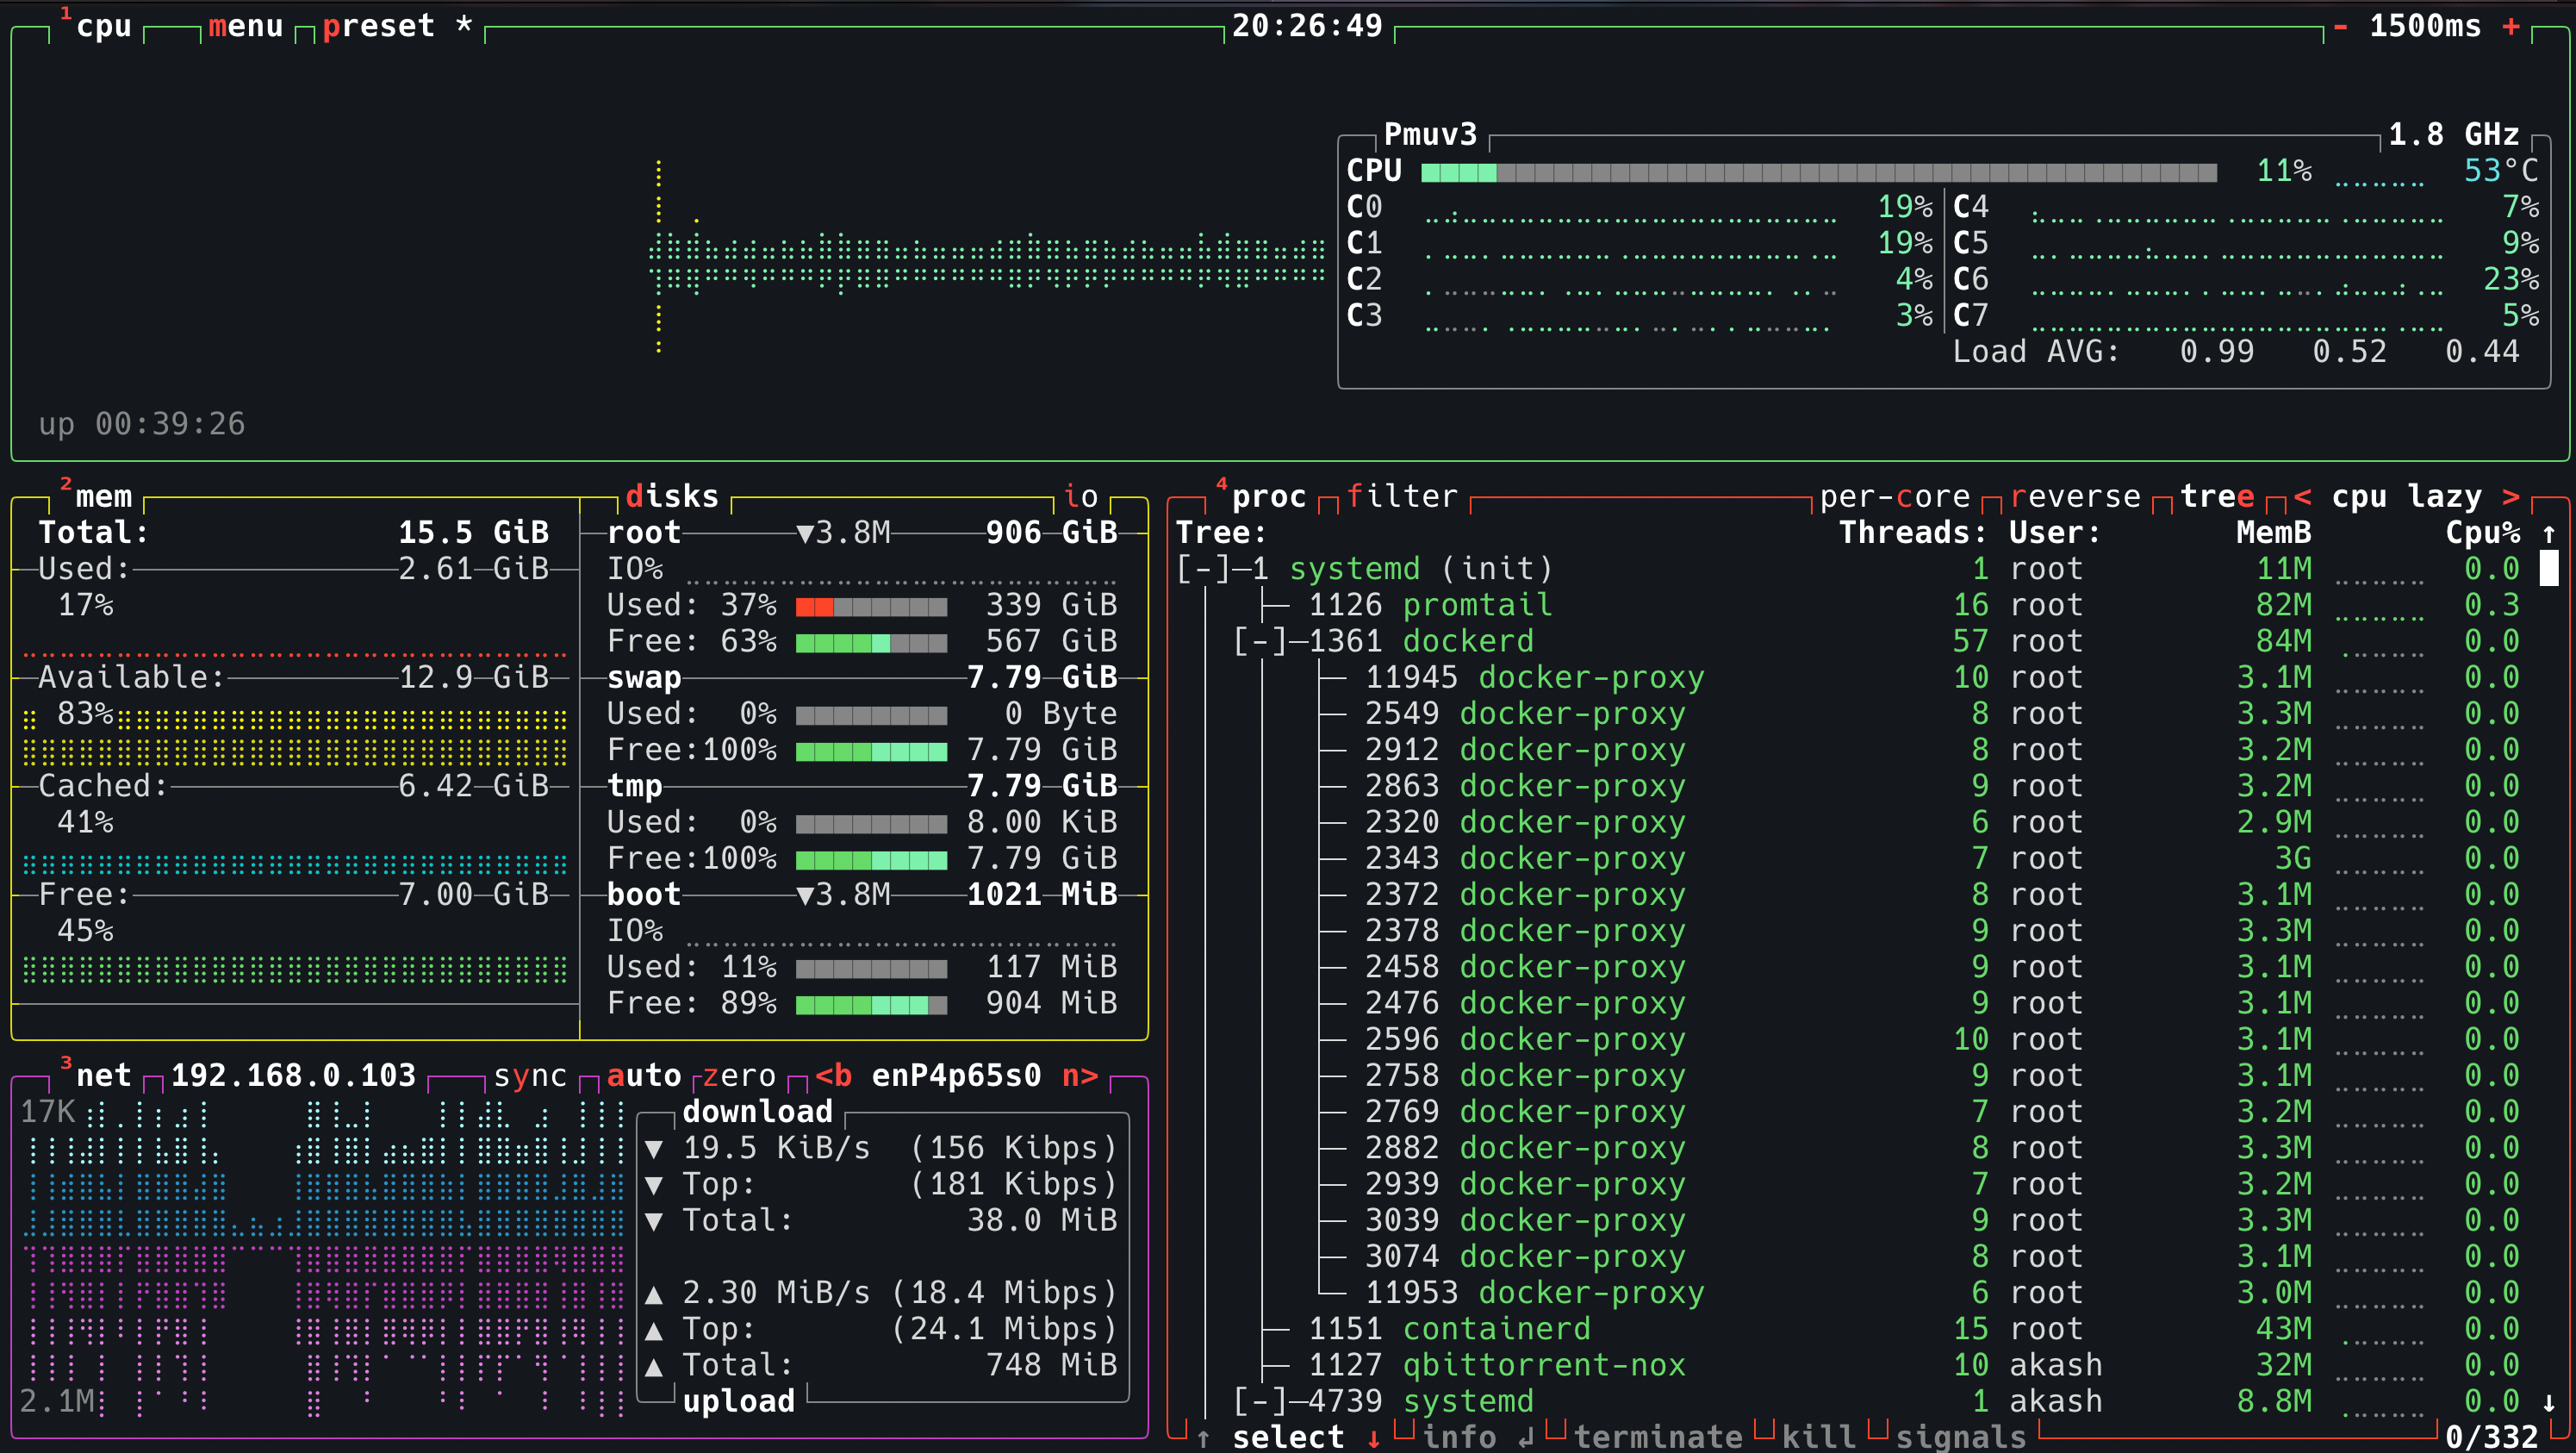
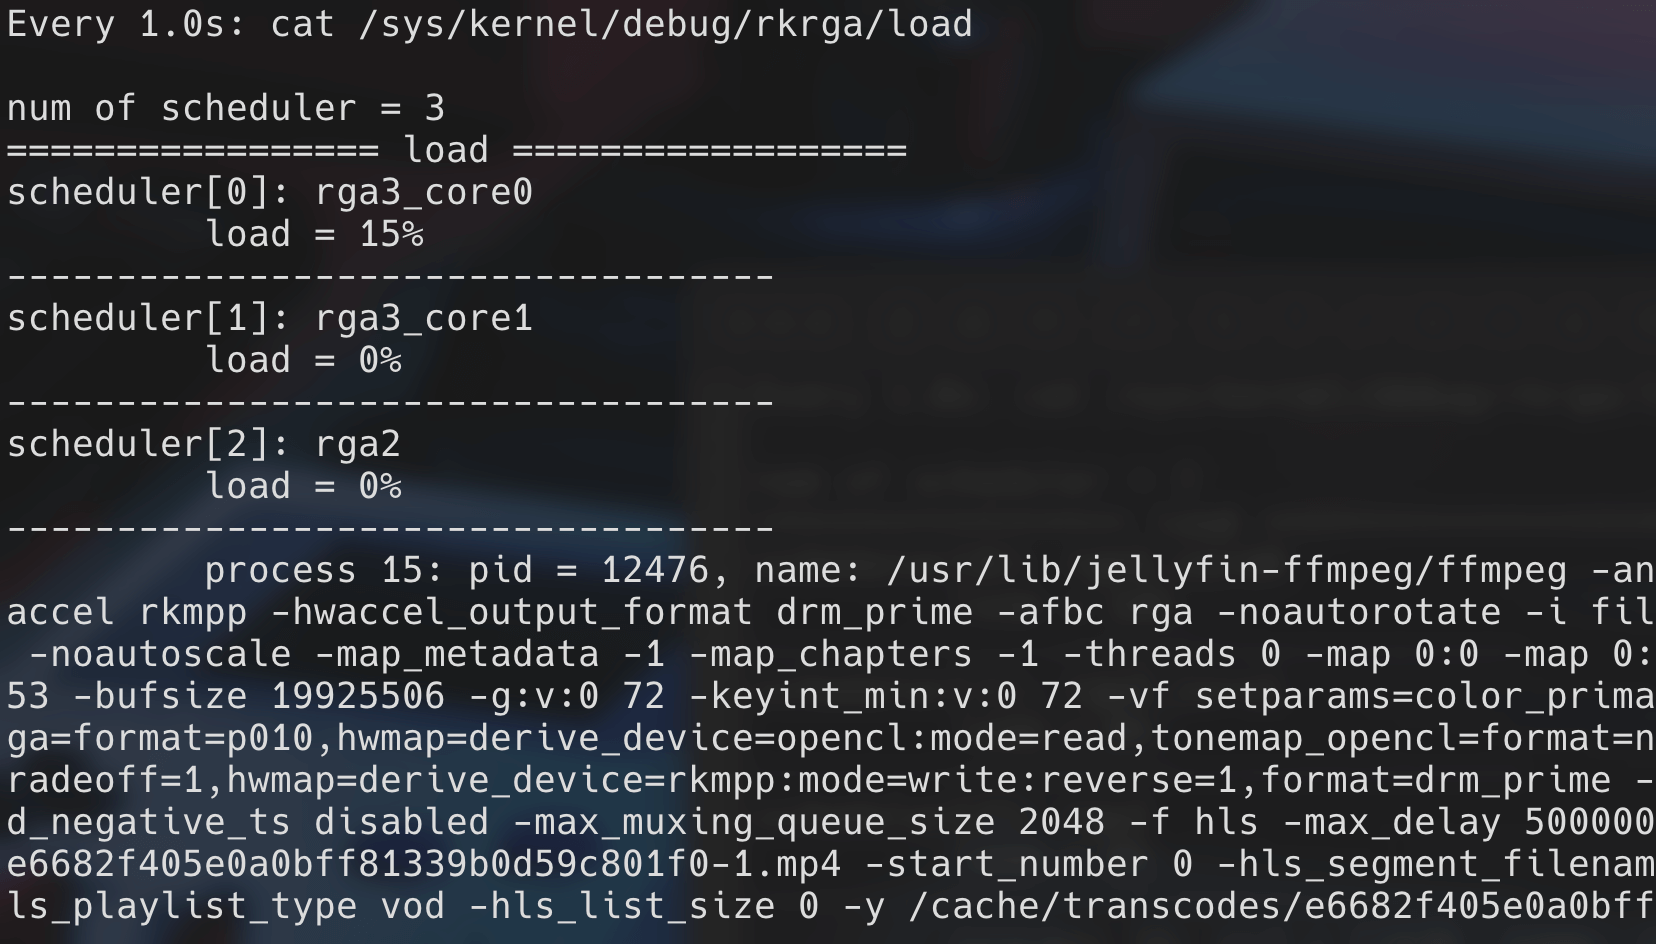
As you can see the average CPU usage is around 10-11% which is quite impressive for a 4K HDR video. This is because the video decoding and encoding tasks are offloaded to the GPU. Here are the stats from the RGA engine.
Now if you are wondering if this is actually any good, then here’s the stats for the same video being played without hardware acceleration.
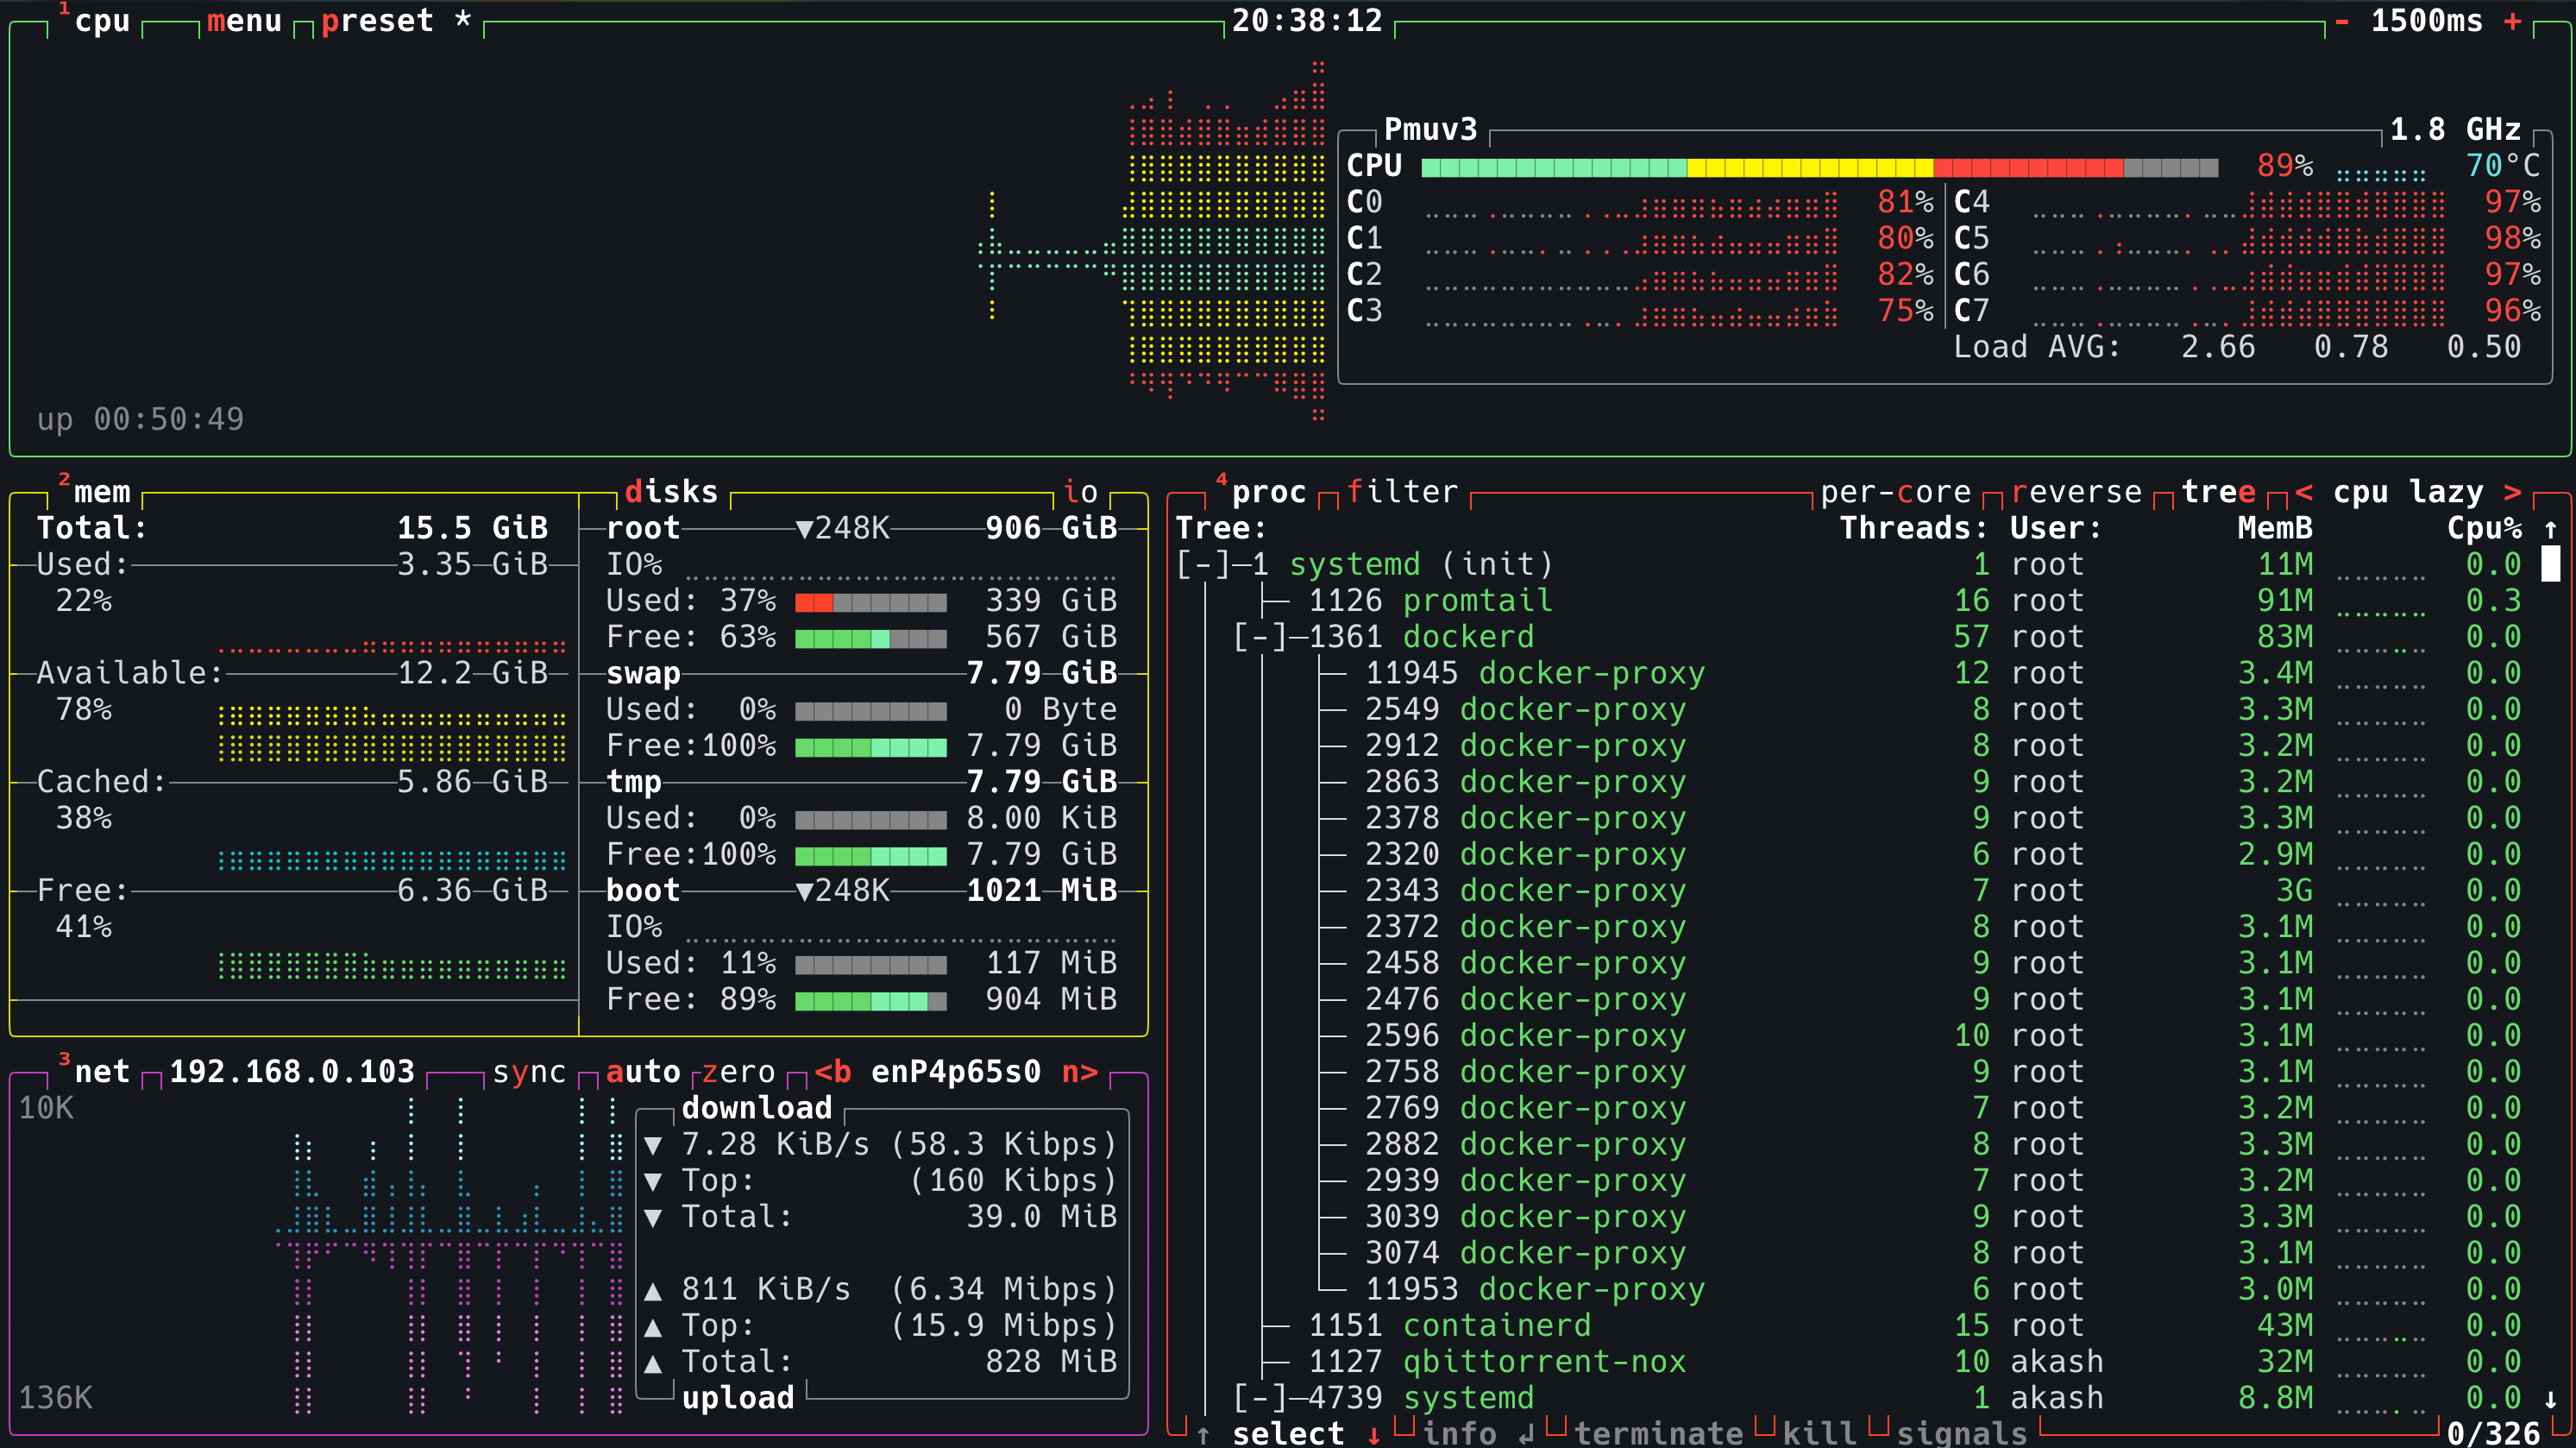
As you see, the CPU usage hovers around 75-80% where sometimes it even goes to 95% which is quite high given its just a single stream that is being transcoded. So yeah, hardware acceleration is definitely worth it.
With the current setup, I was comfortably able to play 2 4K HDR videos simultaneously without any issues. So I am quite happy with the performance.
Common issues
Playback failed due to a fatal player error
If you are facing this issue, then it is likely because of the video group is not added to the container. Add the video group to the container and restart the container. Make sure you add the video group id to the container in the docker-compose file as mentioned before in this blog.
Apart from this, if you want to check that the OpenCL runtime is working correctly, you can run the following command.
docker exec -it jellyfin /usr/lib/jellyfin-ffmpeg/ffmpeg -v debug -init_hw_device rkmpp=rk -init_hw_device opencl=ocl@rkIf you see any errors, then it is likely because of the OpenCL runtime is not working correctly. You can try to install the OpenCL runtime again by following the steps in the Prerequisites section.
If this is also working correctly, you should inspect the network call to the Jellyfin server. You can do this by opening the developer tools in your browser and inspecting the network calls. I ran into a scenario where the request was returning a 431 error ↗️ (Request header fields too large) and this was because I was using a reverse proxy (Caddy) and the default max header size was being hit, if this is the case you can increase the max header size by adding the following to your Caddyfile (or whichever reverse proxy you are using).
Conclusion
That’s it for this post. I hope this guide helps you in setting up Jellyfin with hardware acceleration on your Orange Pi 5 Plus server. If you have any questions or need help, feel free to ask in the comments.
You can also reach out to me on Twitter ↗️ / Reddit ↗️ / Mastodon ↗️.
Until next time, happy blazingly fast streaming! 🍿🎥🎶