Introduction
In the world of web development, ensuring the reliability of your website is paramount. Even the most well-designed websites can encounter errors that impact user experience. This is where Sentry comes to the rescue.
Sentry ↗️ is an exceptional error tracking platform that helps you identify, diagnose, and resolve errors efficiently. In this guide, we’ll learn how you can seamlessly integrate Sentry with Astro ↗️, a blazing-fast site generator, to enhance your website’s stability.
This guide assumes you already understand what is Sentry and have already created a project in Sentry. We will skip that part and jump straight into integrating Sentry with Astro
Integrating Sentry with Astro
To start, let’s focus on integrating Sentry’s browser package into your Astro-powered frontend. The @sentry/browser package empowers you to catch and report errors occurring in the user’s browser.
Install the Sentry browser package
Begin by installing the @sentry/browser package as a dependency in your Astro project.
npm install @sentry/browserInitialize Sentry
Next, import and initialize Sentry with your unique DSN (Data Source Name). You want to add this in your layout ↗️ component.
What I do is I have a BaseHead component which have bunch of tags which I want across all pages in the <head> component.
<!-- Global Metadata --><meta charset='utf-8' /><meta name='viewport' content='width=device-width,initial-scale=1' />
<!-- Include any other base tags -->
<!-- Sentry --><script>  import * as Sentry from '@sentry/browser';
  Sentry.init({    dsn: 'YOUR_SENTRY_DSN',    tracesSampleRate: 1.0,    // This sets the sample rate to be 10%. You may want this to be 100% while    // in development and sample at a lower rate in production    replaysSessionSampleRate: 0.1,    // If the entire session is not sampled, use the below sample rate to sample    // sessions when an error occurs.    replaysOnErrorSampleRate: 1.0,    integrations: [new Sentry.BrowserTracing(), new Sentry.Replay()],  });</script>
Once the BaseHead component have the Sentry integration added, just ensure this BaseHead component get’s used on all the pages where you want to capture error via Layouts.
For example, here’s a simple version of how to use it
---import BaseHead from '../components/BaseHead.astro';---<html lang="en"> <head> <BaseHead /> </head> <body> <main> <slot /> </main> </body></html>Verify the errors
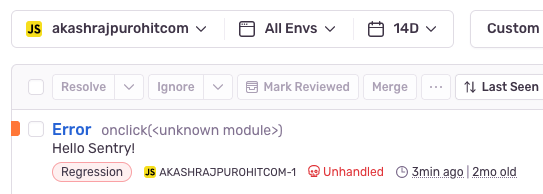
Once the integration is complete and Sentry is loaded on a page, we’ll verify if its indeed catching errors or not.
To do that, we will go to any page and just throw an error on a button click and verify it from the Sentry dashboard.
---import SimpleLayout from '../layouts/SimpleLayout.astro';---
<SimpleLayout>  <button onclick="throw new Error('Hello Sentry!');">Set Fire 🔥</button></SimpleLayout>
Now when you click on the button, you should see an error in console with message “Hello Sentry!” and the error should also show up on Sentry dashboard.
And that’s it, you have successfully integrated Sentry with Astro in Browser.
Integrate Sentry with Cloudflare Adapter
While the Sentry integration in browser is pretty straight-forward, this bonus section will help you integrate Sentry on your API endpoints ↗️ too in Astro.
We will be using toucan-js ↗️ which is an official sentry client for Cloudflare Workers.
This section assumes you already have an Astro site with Cloudflare Adapter setup and running in either ‘server’ or ‘hybrid’ mode. If not then follow along the official guide ↗️ from Astro community
Install the toucan-js package
Begin by installing the toucan-js package as a dependency in your Astro project.
npm install toucan-jsCreate a getSentry utility
We will create a simple utility function which will return us the Toucan object with the configuration options. This depends on your project folder structure but I generally have a lib folder inside src directly.
import { Toucan } from 'toucan-js';
export const getSentry = (request: Request) => {  const sentry = new Toucan({    dsn: 'YOUR_SENTRY_DSN',    request,    tracesSampleRate: 1.0,  });
  return sentry;};
With this utility function, we can now move to any API endpoint we have and start integrating it.
Integrating Sentry on API endpoint
Consider we have an endpoint which returns current timestamp, let’s add error handling to it.
import type { APIRoute } from 'astro';import { getSentry } from '../../../lib/utils';
export const get: APIRoute = async ({ request }) => {  const sentry = getSentry(request);  try {    const response = {      time: new Date();    };
    throw new Error('Hello Sentry!');
    return new Response(JSON.stringify(response), {      status: 200,      headers: {        'Content-Type': 'application/json',      },    });  } catch (err) {    sentry.captureException(err);
    return new Response(      JSON.stringify({        error: true,      }),      {        status: 500,        headers: {          'Content-Type': 'application/json',        },      },    );  }};
Here we are importing our utility function and initializing it by passing the request object. In the try-catch block we are capturing the exception using sentry.captureException(err).
Once again to verify it, we are explictly throwing an error and it should again show up in your Sentry dashboard as seen above.
Next Steps
You might be thinking that for API endpoints we have to do these steps for each file and not something holistic like we did to catch browser errors.
Well there could be ways to integrate this using Astro middleware ↗️ but I remember I had some troubles integrating it via middlwares back when I was trying to integrate it and it was behind experimental flag.
Since I have a handful of API endpoints on this site, this approach made sense for me but I’ll definitely be looking forward to try and integrate this using middleware so all API endpoints can capture errors and send them to Sentry holistically.
Death is hard enough. Accessing accounts shouldn't be.

When someone passes away, their family is often locked out of the accounts, documents, and details they were meant to have. Eternal Vault is my fix for that: a secure place to store what matters and hand it to the right people when it's needed.
Conclusion
Integrating Sentry with Astro provides a robust solution for error tracking, both on the frontend and with API endpoints. By following these steps, you’ll empower your website to provide a smoother user experience, proactively identifying and resolving issues. Elevate your website’s reliability today by seamlessly integrating Sentry with your Astro project.
Remember, error tracking isn’t just about identifying problems, it’s about delivering a stellar user experience. With Sentry and Astro, you’re equipped to deliver just that.